Recognise whole numbers and can colour in the appropriate number of squares.
Mathematics: Numeracy
Note from the authors
This activity is about compressing data, and the only background needed to engage with this idea is to be able to count.
All data on computers is stored using bits (to learn more about this, see the CS Unplugged activities on binary digits), and the key question in compression is whether or not we can represent the same image using fewer bits, but still be able to reconstruct the original image.
It turns out we usually can, and this is key to being able to store and download pictures and videos in the vast quantities that have become common.
There are many ways of going about it (for example JPEG, MP3 and Zip are compression methods).
In this lesson we are focussing on a compression method called run-length encoding.
Key questions
Where have you seen images being stored or shared on digital devices?
Potential answers could include:
Students might realise that pictures and photographs are examples of images.
Taking photos on a mobile phone or other digital device
Sharing photos on social media
On printers
On websites e.g. shopping
Icons
Lesson starter
Draw or display an 8 x 8 grid with the indicated squares coloured in to make this shape (it happens to be a duck, missing the last three lines).
If you haven’t taught the Colour by Numbers lesson then check if your students understand the origin of the word ‘pixels’ by asking: Does anyone know what the tiny dots are that are used to create digital pictures?
If they have say pixels, then ask if they know where the word pixels comes from.
Take the printable of the words picture elements - saying that computer scientists create jargon to be more efficient, and rip up the words to show pic and el, which you can put together, then change the 'c' to an 'x' to show how the word is formed.
(The 'x' just comes from abbreviating 'pictures' as 'pix'; you may have heard similar abbreviations such as 'tix' for 'tickets').
The image above is a very simple black and white picture - each pixel is either black or white.
It has been magnified to show the pixels.
When a computer stores a picture like this, it just needs to store each pixel as black or white.
Teaching observations
Some students may point out that there is sometimes grey in a ‘black and white’ image.
Images with grey in them are not technically black and white, but rather ‘grayscale’, although grayscale images are often (confusingly) referred to as ‘black and white’, for example, in black-and-white photos.
Grayscale images are also sometimes called ‘monochrome’, although technically monochrome is any image that uses shades of one colour, such as blueprints or sepia photographs.
For this lesson we are only dealing with simple black and white images, even if the terminology isn’t very, well, black-and-white!
Discuss how you might communicate the black and white pixels in an image to one another if you could only use letters, words and numbers.
Potential answers include:
Saying ‘black’ and ‘white’ or variations of this, including 0 and 1 as binary digits.
Counting the number of black and white squares (pixels) and representing these with different notations such as W1, B3, W1 - this is the point where students are thinking about compressing their data.
Prompt students to discuss if we need some conventions, like where to start, do we go left to right, left down, right down, right to left?
If we all agreed the first pixel is likely to be white, what compression code could we create?
Teaching observations
The international convention is left to right, starting with white (since the margins of a paper document are usually white).
But other conventions could be used, as long as the sender and receiver use exactly the same convention.
What do you see?
Is there a connection between the squares and the numbers?
Teaching observations
The picture above shows us how a picture can be represented by numbers.
The first line consists of four white pixels, then two black, then two white.
Thus the first line is represented as 4, 2, 2.
Write the encodings for the first four lines of the pixelated image.
What do you notice about this row?
How many white squares are coloured?
The first number always represents the number of white pixels.
Teaching observations
Students may ask what happens if the first pixel is black; you can guide them to realise that the line would then begin with a zero.
Ask for a volunteer to be your printer.
Their job is to follow your instructions to complete the image below (note don’t show them the complete image).
The printer (student) needs to pick up a felt tip pen and print (colour in) the final three lines.
Check your printer understands their job by reviewing the first line.
Let’s look at the numbers: 4, 2, 2 - as a printer how does that interpret?
4 = white, 2 = black, 2 = white.
Keep checking that the printer understands, once the printer says they are ready - then give the instructions to print the last three lines.
Saying one number, then the next as the printer translates your instructions onto the image.
Once the image is complete - what do you see?
Using a section from the teacher printable: Show the small duck printout and explain that what has just been drawn is a blown up version of this small picture.
Lesson activities
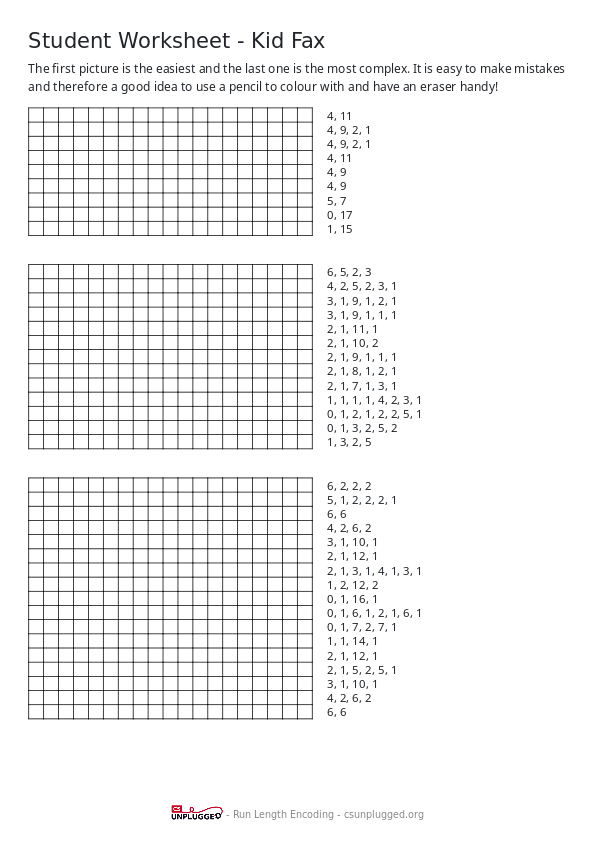
There are three activity worksheets for students to complete following the above run-length encoding algorithm.
It is easy to make mistakes when completing the worksheets, therefore a good idea to use a pencil to colour with and have an eraser handy!
Instead of using the printout, students could create these pictures digitally on a free pixel art site, which reduces the frustration of making mistakes, although is less tangible.
Teaching observations
The activity sheets have a row beginning with zero white pixels (e.g. 0, 17).
This may be a point that needs reinforcing more than once.
A question you could ask when students are confused is “Why not just start with the number of black pixels?”
(The reason is that the person decoding it would think that is the number of white pixels).
Variations and Extensions
Try drawing with a sheet of tracing paper on top of the grid, so that the final image can be viewed without the grid.
The final image will be clearer.
Instead of colouring the grid the students could use squares of sticky paper or other square objects placed on a larger grid.
Extra activities are available within the Pixel Painter printable by selecting the run-length encoding option.
As a follow up activity, students can make their own run-length encoding image online in the Computer Science Field Guide.
Applying what we have just learnt
One digital device that relied heavily on run-length encoding was the facsimile machine or fax machine.
If your students haven’t experienced sending a fax, ask them to find someone who has and have them explain the process of how they did it.
They could ask the person if they know how the run-length encoding worked (they probably didn’t know that).
They could then complete the run-length encoding activity with the person they interviewed.
We’ve skipped a few details on how the numbers themselves are represented, but students can get an idea of how much more efficient run-length encoding is if they compare reading out the pixels in one of the larger images (‘white white white white black black, etc’) compared with reading the numbers (4, 11).
This exercise also shows the importance of agreeing on standards for compressed files, so that a file compressed on one computer can be decompressed on another.
In this case, you need to know the order (left to right), and that the first pixel in each row is white.
There are other standards, like JPEG and MP3, that allow images and sound to be recorded on one brand of equipment and played back on a variety of devices.
The version of run-length encoding (RLE) used in this exercise above only works well for black and white images, and isn’t so good for photographs, because in photos the level of colour detail is so accurate that it’s very unlikely that two adjacent pixels are exactly the same colour.
A different method, called JPEG, works particularly well for colour photos.
It finds patterns in the variations of the colours in a photo, and converts the patterns to numbers that are then compressed using RLE.
Even though photographs and colour pictures are harder to compress than black-and-white images, they are still often compressed to a tenth or even a hundredth of their original size (using techniques such as JPEG, GIF and PNG).
This allows many more images to be stored on a disk, and it means that viewing them over the web will take a fraction of the time.
You need to choose which compression technique best suits the images you are working with, but either way, a form of run-length encoding is likely to be at work behind the scenes to make sure your pictures are stored and shared as efficiently as possible.
Lesson reflection
Why do we only need one bit per pixel when the image is in black and white?
Because each bit (0 or 1) can represent either white or black
What would be the consequences if images couldn’t be compressed?
They would take a long time to transmit and people wouldn’t wait for them.
They would also take up a lot of disk space, and devices like mobile phones couldn’t hold many photos.
The approach used for this activity is simplified so that the image can be worked with by hand.
For further reading on the remarkable ways that pixels are used on digital devices, see:
Throughout the lessons there are links to computational thinking. Below we've noted some general links that apply to this content.
Teaching computational thinking through CSUnplugged activities supports students to learn how to describe a problem, identify what are the important details they need to solve this problem, break it down into small logical steps so that they can then create a process which solves the problem, and then evaluate this process. These skills are transferable to any other curriculum area, but are particularly relevant to developing digital systems and solving problems using the capabilities of computers.
These Computational Thinking concepts are all connected to each other and support each other, but it’s important to note that not all aspects of Computational Thinking happen in every unit or lesson. We’ve highlighted the important connections for you to observe your students in action. For more background information on what our definition of Computational Thinking is see our notes about computational thinking.
Algorithmic thinking
Examples of what you could look for:
Students are able to articulate and follow the process (algorithm) for converting a sequence of pixels to numbers, and convert numbers to pixels.
Those who have learned programming could implement the algorithm that reads in the numbers, and displays lines of pixels (in a text-based language this could be done using the @ symbol for a black pixel and a space for a white pixel), and vice-versa.
Abstraction
Examples of what you could look for:
Students are able to see that the run-length encoding codes are equivalent to a representation of a picture.
They may make the connection that the numbers in the RLE code will actually be stored using a binary representation.
Decomposition
Examples of what you could look for:
Students can decompose an image into horizontal lines, and then decompose those lines into alternating run-length encodings of white and black pixels.
Generalising and patterns
Examples of what you could look for:
They appreciate that run-length encoding works because images tend to have a pattern of clusters (runs) of black or white pixels.
They can generalise the concept to using more than two colours (this requires stating which colour each RLE is).
They could also apply run-length encoding to other types of data (such as minute-by-minute temperature readings, where the same temperature is read many times in a row).
Evaluation
Examples of what you could look for:
Are students able to see that reading out the run-length encoding is likely to be faster than reading out all the pixels?
Can they think of a kind of image where it wouldn’t be? (You could guide them towards images that have alternating black and white pixels).
If they are familiar with how numbers are represented on computers (binary), are they able to evaluate how much space this encoding saves in more detail?
For example, if run-length encodings are represented as a 3-bit binary value (000 to 111), then the maximum run length is 7 pixels (111 in binary equals 7 in decimal).
A RLE code of 6 identical pixels would be represented as 3 bits (110), half the size, compared to recording each individual pixel (111111 or 000000), but alternating single black and white pixels would actually use more space because they don’t fit the expected pattern of long run-length encodings of the same colour.
Logic
Examples of what you could look for:
They can reason that the assumption that each code line begins with white pixels does not prevent the first pixel from being black.
They can also see solutions to having a maximum length of a run-length encoding (inserting a zero-length RLE of the opposite colour).
This definition is not available in English, sorry!